Virtual Hard Disk (VHD) is a file format from Microsoft which represents a virtual hard disk drive (HDD). It may contain what is found on a physical HDD, such as disk partitions and a file system, which in turn can contain files and folders. Windows Azure service instances can use the hpcpack command to mount VHD files as a drive directly from a Windows Azure storage account.
Local storage on Azure is not persistent. When a service instance is stopped and then restarted on a different hardware node, the data stored in local storage does not follow the instance. However, you can use a VHD file in your Windows Azure storage account to provide a persistent storage location for your projects. Also, multiple service instances can mount the same VHD file as read-only, making this a great way to distribute static data to compute cluster nodes, e.g. terrain or meteorological data in a WRF simulation run.
 This work was sponsored by the Microsoft Developer and Platform Evangelism Team.
Creating and Mounting VHD Files in Linux
From an HPC Linux installation, we can create VHD files and format them, mount and unmount them, and copy files to and from them. You can do all this as a normal user; root access is not required.
Create an NTFS-formated VHD File
-
From a shell prompt in HPC Linux, use the dd command to create a new fixed-size raw disk image file. For example, to create a raw image file named “image.raw” that is 50M in size, execute:
dd if=/dev/zero of=image.raw bs=1M count=50
You can set “bs” to be any block size you like in kilobytes (K), megabytes (M), gigabytes (B), or terabytes (T). “count” sets the image file size in blocks, so “bs=1G count=1” would create a file of one gigabyte, or “bs=10M count=10” would create a file of 100 megabytes.
") VHD files may not be larger that two terabytes.
VHD files may not be larger that two terabytes. - Create a new NTFS filesystem on the raw disk image:
/sbin/mkntfs -F image.raw
-
Use VirtualBox to convert image.raw to a VHD file named image.vhd. Change “image.raw” and “image.vhd” as appropriate:
VBoxManage convertfromraw image.raw image.vhd --format VHD --variant Fixed
You should see something like:
Converting from raw image file="test.dd" to file="test.vhd"...
Creating fixed image with size 52428800 bytes (50MB)...
If instead, you see this error message:
<span id="line-1-1" class="anchor"></span>VBoxManage: error: Cannot create the disk image "test.vhd": VERR_INVALID_PARAMETER
then first try creating the file as a standard VHD file and then re-create it as a fixed file:
VBoxManage convertfromraw image.raw image.vhd --format VHD
rm image.vhd
VBoxManage convertfromraw image.raw image.vhd --format VHD --variant Fixed
The VHD file must be in fixed format to be mountable from a Windows Azure storage account. - We’re done with the raw image file, so you can remote it to save space:
rm image.raw
Mount and Unmount a VHD File (no superuser)
-
Create a mountpoint folder and use FUSE to mount the VHD file:
mkdir -p $HOME/mnt/image
ntfs-3g -o windows_names image.vhd $HOME/mnt/image
The -o windows_names flag prevents files, directories and extended attributes from being created with a name not allowed by Windows, either because it contains some illegal character (e.g. " * / : < > ? \ |) or because the last character is a space or a dot.
-
Now any files you create in $HOME/mnt/image will actually be created on the VHD file. Copy files, compile programs, or do anything you like with the VHD file.
- You should unmount the VHD file before you copy it to Windows Azure:
fusermount -u $HOME/mnt/image
Now you can copy your VHD file to a Windows Azure storage account and mount it as a drive.
Use nbd to Mount a VHD File (superuser required)
If you have root access, you can use the network block device kernel module to mount and unmount the VHD file.
- Load the network block device kernel module:
modprobe nbd
-
Start qemu-nbd, a user space loopback block device server for QEMU-supported disk images. Basically, it knows all about weird disk image formats and presents them to the kernel via nbd, and ultimately to the rest of the system, as if they were a normal disk:
qemu-nbd -c /dev/nbd0 image.vhd
-
qemu-nbd will expose the entire image as a block device named /dev/nbd0, and the partitions within it as subdevices. For example, the first partition in the image will appear as /dev/nbd0p1. Because we created the NTFS directly on the raw image, this VHD file has no partitions and the data is accessed directly at /dev/nbd0. Mount /dev/nbd0:
mount /dev/nbd0 /mnt
- When you’re done, unmount the filesystem and shut down the qemu-nbd service:
umount /mnt
qemu-nbd -d /dev/nbd0
modprobe -r nbd
Now you can copy your VHD file to a Windows Azure storage account and mount it as a drive.
Copying VHD Files to and from Windows Azure Storage
There are many ways to copy files to Windows Azure storage blobs, both graphically and on the command line. Here are three ways you will probably find useful when working with a Windows Azure HPC Compute Cluster.
HPC Linux Shell Prompt
PToolsWin includes a command line utility for uploading and downloading files directly to and from Windows Azure blob storage. Enter your account name and storage key when prompted:
azurestorage put image.vhd
Similarly, you can download files by executing:
azurestorage get image.vhd
Windows Azure Service Instance
If your VHD file is stored locally on a service instance, you can use hpcpack upload to copy it to your storage account. Type the following command on one line in a Command Prompt window to upload “image.vhd” to a page blob in a container named “vhd”. Replace <account_name> and <storage_key> with your storage account name and key, respectively:
hpcpack upload image.vhd /account:<account_name> /key:<storage_key> /blobtype:pageblob /container:vhd
You can use hpcpack download if you wish to download the VHD file to a service instance. Type the following command on one line in a Command Prompt window to download “image.vhd” from a container named “vhd”. Replace <account_name> and <storage_key> with your storage account name and key, respectively:
hpcpack download image.vhd /account:<account_name> /key:<storage_key> /container:vhd
-
Remember, local storage on Windows Azure is not persistent.
When a service instance is stopped and then restarted on a different hardware node, the data stored in local storage does not follow the instance. If you make changes in your VHD file, and you wish to preserve those changes, you must upload the VHD file back to your storage account. For this reason, it is better to mount the VHD file than to copy it to local storage.
Web Browser
You can access myAzureStorage Explorer from any web browser. Go to https://www.myazurestorage.com and enter your storage account name and primary access key. ![]() myAzureStorage is great for “small” files, may not work well for “large” files. You may not be able to transfer large VHD files, but it’s a nice way to browse your storage account’s contents and verify the results of your command line operations.
myAzureStorage is great for “small” files, may not work well for “large” files. You may not be able to transfer large VHD files, but it’s a nice way to browse your storage account’s contents and verify the results of your command line operations.
Mounting VHD Files in Windows Azure
After you’ve uploaded your VHD file to your Windows Azure storage account, you can use hpcpack mount to mount it as a drive in on your Windows Azure service instances. Any changes you made to the VHD file while it is mounted take place in your storage account instead of in the node instance’s local storage.
- Only one service instance at a time can mount the VHD with both read and write privileges. Execute this command to mount “image.vhd” from the “vhd” container as a read/write drive:
hpcpack mount image.vhd /account:<account_name> /key:<storage_key> /container:vhd
If the command succeeds, you will be informed of which drive letter image.vhd has been mounted as. Drive letter “F” is usually chosen.
-
The contents of image.vhd are now available at the specified drive letter. Create, move, and delete files and folders as you wish. When you are done, unmount the VHD file by executing the following command. Replace ‘<drive_letter>’ with the correct drive letter (e.g. “F:”)
hpcpack unmount <drive_letter>
If your VHD file contains static data that you wish to share with many service instances, you can mount the VHD file as a read-only snapshot.
-
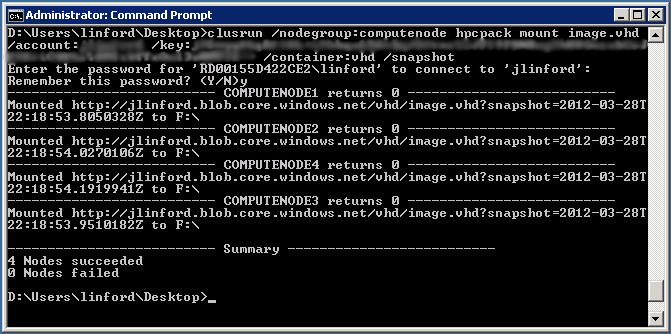
From a Command Prompt window on the cluster head node, execute this command to mount “image.vhd” from the “vhd” container as a read-only drive on all cluster nodes. Replace <account_name> and <storage_key>with your storage account name and key, respectively:
clusrun /nodegroup:computenode hpcpack mount image.vhd /account:<account_name> /key:<storage_key> /container:vhd /snapshot
If the command succeeds, you will see output similar to this:
-
When you are done with the VHD file, unmount it by executing the following command. Replace ‘<drive_letter>’ with the correct drive letter (e.g. “F:”)
clusrun /nodegroup:computenode hpcpack unmount <drive_letter>
Additional Resources