These instructions will help you use the Windows Azure HPC Scheduler to deploy a parallel computing cluster of four nodes (eight cores) as a Windows Azure service. You will install two Microsoft SDKs to your local Windows installation, open the Windows Azure Management Portal, and execute a Powershell script to deploy the cluster service.

![]()
This work was sponsored by the Microsoft Developer and Platform Evangelism Team and nCore Design.
Prerequisites
We’ll begin by configuring your local Windows installation with the Windows Azure SDK and the Windows Azure HPC Scheduler SDK and acquainting you with the Windows Azure Management Portal. Follow the instructions below to prepare your Windows installation.
Windows Azure SDK version 1.6
The Windows Azure SDK gives developers the necessary tools to interface local applications with Windows Azure services. The full SDK for Microsoft .NET is required to use the tools presented in this tutorial.
-
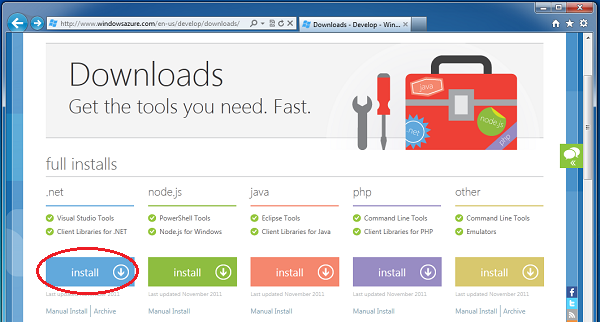
Go to the Windows Azure Developer Downloads site and click the “install” button to download the full install of the Windows Azure SDK for .NET:
-
Execute the downloaded file. You will be prompted three times to allow the operation. Click Allow, Allow, Yesto begin the installation.
-
The Web Platform Installer may also prompt you to select the authentication mode for SQL Server Express. If this happens, choose Mixed Mode Authentication and set a password that you will remember. The SDK will take a few minutes to download and install.
-
Click Finish and Exit to complete the installation and exit Web Platform Installer.
Windows Azure HPC Scheduler SDK version 1.6
The Windows Azure HPC Scheduler will help you to launch and manage parallel HPC applications on a Windows Azure service. Its main jobs are to make it easy to deploy and use a parallel computing cluster as a Windows Azure service and to manage the HPC jobs you execute on the cluster.
-
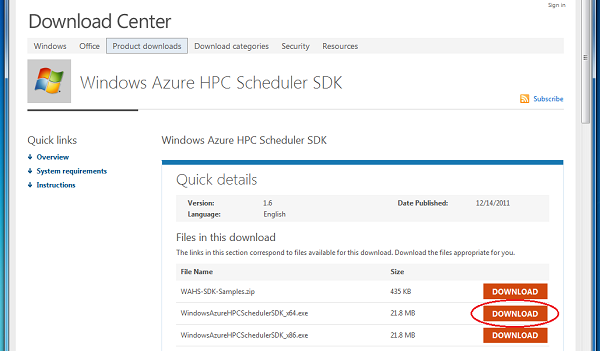
Download the Windows Azure HPC Scheduler SDK 64-bit installer from the Microsoft Download Center:
- Execute the downloaded file. You will be prompted to allow the installation. Install the SDK in the default location.
The Windows Azure Management Portal
Windows Azure Management Portal is the seat of power for your Windows Azure subscriptions. From the portal, you can perform service deployment and management tasks and monitor the overall health of your deployments and accounts.
-
Microsoft Silverlight is required to use the portal. Go to http://www.microsoft.com/silverlight to install Silverlight in your browser.
-
Go to http://windows.azure.com to log on to the Windows Azure Management Portal. Be sure to use the same Windows Live ID and password that you used to create your Windows Azure subscription.
Important
Don’t forget the dot ‘.’ between “windows” and “azure” in the above URL. If you do, you will be taken to the Windows Azure Homepage, not the Windows Azure Management Portal.
- We’ll be referring to the portal throughout this part of the tutorial, so stay logged in and keep the browser window open.
Deploy Windows Azure HPC Scheduler via Powershell
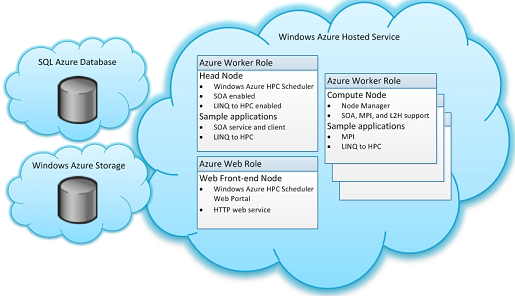
Deploying the Windows Azure HPC Scheduler involves creating Windows Azure components:
- A Hosted Service containing six role instances:
-
One HeadNode instance to schedule, manage, and coordinate the parallel deployment,
-
Four ComputeNode instances to provide computational resources,
-
And one FrontEnd instance to provide web-based job submission and monitoring.
-
- A Storage Account to hold state information for the cluster and provide a persistent shared storage location to all role instances,
- And finally, a SQL Azure Database for maintaining scheduler configuration and state information.
All these components can be created easily with Microsoft Visual Studio Professional or via a Powershell script. We will use the Powershell approach because it has fewer prerequisites and is better suited to our needs in this tutorial.
-
Download the PowerShell script package to your Windows installation and extract the zip file to create the WAHSPowershellDeployment folder.
-
Double-click on Setup.cmd. Click Allow when you are prompted to allow Setup.cmd to make changes to your computer and you will be presented with a Powershell prompt in the WAHSPowershellDeployment\Code folder. We will refer to this window throughout this part of the tutorial.
- Execute the following command in the Powershell window:
.\Deploy-HPCWindowsAzureScheduler.ps1
-
Enter azuretutorial.csdef when you are prompted for InputCSDef and azuretutorial.cscfg when you are prompted for InputCSCfg:
Supply values for the following parameters:
InputCSDef: azuretutorial.csdef
InputCSCfg: azuretutorial.cscfg
We’ll learn more about these two files later on.
-
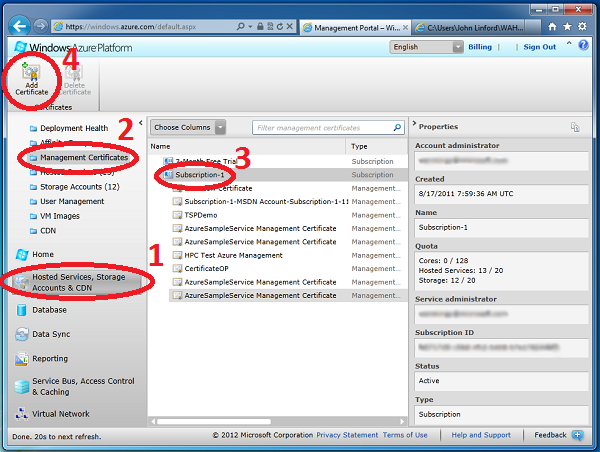
Enter your Subscription ID when you are prompted for SubscriptionID. To locate your Subscription ID, go to the Windows Azure Management Portal and click on Hosted Services, Storage Accounts & CDN, Hosted Services, and find the subscription you want to use. Your Subscription ID is in the properties pane on the right:

Copy the Subscription ID by highlighting it with your mouse and pressing Ctrl+C. Return to the Powershell Prompt and paste it by right-clicking and selecting Paste. Press Enter to continue.
-
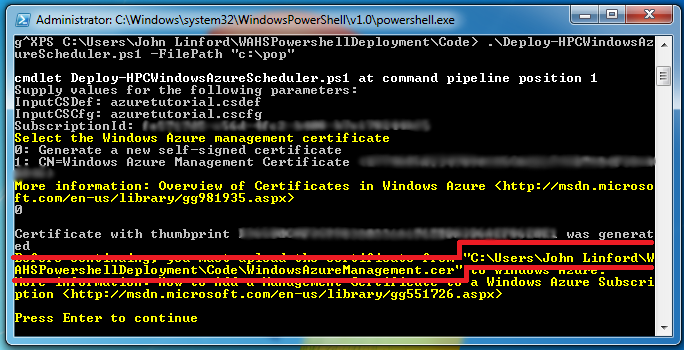
Enter 0 when you are prompted for your Windows Azure management certificate to generate a new self-signed certificate, or, if you installed a certificate earlier, type the number of the certificate you would like to use.
-
If you generated a new certificate you will need to install it. In the Management Portal, click on Hosted Services, Storage Accounts & CDN, Management Certificates, and find the subscription you wish to use. Click on Add Certificate.
Tip
Certificates and their use in Windows Azure is a detailed topic. See Overview of Certificates in Windows Azure to learn more.
- Check the Powershell window to find the location of the newly-generated self-signed certificate:
-
In the Management Portal, browse to the certificate file and click OK. After a few seconds, your new certificate will appear on the list of management certificates. Return to the Powershell console and press Enter to continue.
-
Enter 0 to create a new hosted service. Specify a name for the new hosted service and wait for the new hosted service to be created.
The hosted service name must be less than 15 characters long
The script will not check the length of your hosted service name, so be careful to not use more than 15 characters. If your hosted service name is too long, the script will fail later on.
-
Enter Y when you are prompted to create a new certificate for password encryption and SSL. Wait a few seconds for the new certificate to be created.
-
Enter 0 when you are prompted to select a storage account. Specify a name for your new storage account and wait for the new storage account to be created.
-
Enter 0 when you are prompted to select a SQL Azure server. Enter a name for the SQL Azure server administrator (e.g. admin) and a password for the administrator account. The password must contain at least three of the following four classes:
- Uppercase alphabetical (e.g. ABCDEFG…)
- Lowercase alphabetical (e.g. abcdefg…)
- Numeric (e.g. 123456789)
- Non-alphanumeric (e.g. !@#$%.;[])
-
Enter 0 when you are prompted to select a database. Specify the name of your database, and again enter the new administrator name and password. Wait while your database is initialized.
-
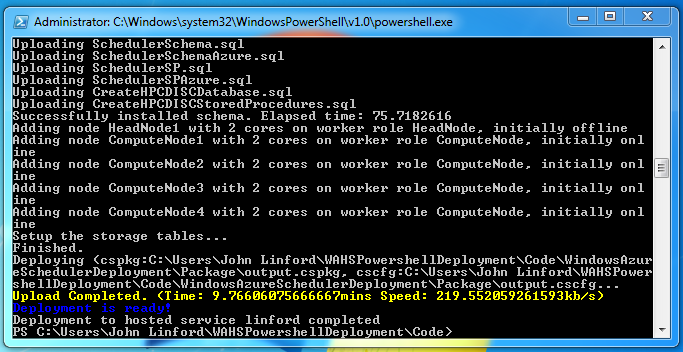
The script will now begin the deployment process by uploading files to a Windows Azure storage container and creating role instances. This may take up to an hour to complete, so be patient. In the meantime, let’s learn more about how we define the deployment topology.
There are two files that work together to define our cluster: a service definition file with a .csdef extension and a service configuration file with a .cscfg extension. Earlier, we specified these files as azuretutorial.csdef and azuretutorial.cscfg. The service definition file defines the Windows Azure roles (e.g. HeadNode, ComputeNode, etc.) that our service will use. Here is a copy of azuretutorial.csdef:
<?xml version="1.0" encoding="utf-8"?>
  <ServiceDefinition name="TestService" xmlns="http://schemas.microsoft.com/ServiceHosting/2008/10/ServiceDefinition">
    <WebRole name="FrontEnd" vmsize="Small">
     <Sites>
       <Site name="HPC">
         <VirtualApplication name="Portal" />
         <Bindings>
           <Binding name="HPCWebServiceHttps" endpointName="Microsoft.Hpc.Azure.Endpoint.HPCWebServiceHttps"/>
         </Bindings>
       </Site>
     </Sites>
     <Endpoints>
     </Endpoints>
     <Imports>
       <Import moduleName="Diagnostics" />
       <Import moduleName="RemoteAccess" />
       <Import moduleName="HpcWebFrontEnd" />
     </Imports>
     <ConfigurationSettings>
     </ConfigurationSettings>
     <LocalResources>
       <LocalStorage name="WFELocalStorage" cleanOnRoleRecycle="false" />
     </LocalResources>
     <Startup>
     </Startup>
   </WebRole>
   <WorkerRole name="HeadNode" vmsize="Medium">
     <Imports>
      <Import moduleName="Diagnostics" />
       <Import moduleName="RemoteAccess" />
       <Import moduleName="RemoteForwarder" />
       <Import moduleName="HpcHeadNode" />
     </Imports>
     <ConfigurationSettings>
     </ConfigurationSettings>
     <Endpoints>
     </Endpoints>
   </WorkerRole>
   <WorkerRole name="ComputeNode" vmsize="Medium">
     <Imports>
       <Import moduleName="Diagnostics" />
       <Import moduleName="RemoteAccess" />
       <Import moduleName="HpcComputeNode" />
     </Imports>
     <ConfigurationSettings>
     </ConfigurationSettings>
   </WorkerRole>
 </ServiceDefinition>
As you can see, we’ve defined a small HpcWebFrontend role named “FrontEnd”, a medium HpcHeadNode role named “HeadNode”, and a medium HpcComputeNode role name “ComputeNode”. The size of the node corresponds directly to the Windows Azure Virtual Machine Size and ranges from “extra small” to “extra large”. Notice that the service configuration file does not say how many instances of each role we will create. Our cluster’s configuration parameters are defined in azuretutorial.cscfg:
<?xml version="1.0" encoding="utf-8"?>
<ServiceConfiguration serviceName="TestService" xmlns="http://schemas.microsoft.com/ServiceHosting/2008/10/ServiceConfiguration" osFamily="2" osVersion="*">
  <Role name="FrontEnd">
    <Instances count="1" />
     <ConfigurationSettings>
       <Setting name="Microsoft.WindowsAzure.Plugins.Diagnostics.ConnectionString" value="UseDevelopmentStorage=true" />
     </ConfigurationSettings>
  </Role>
  <Role name="HeadNode">
    <Instances count="1" />
    <ConfigurationSettings>
      <Setting name="Microsoft.WindowsAzure.Plugins.Diagnostics.ConnectionString" value="UseDevelopmentStorage=true" />
    </ConfigurationSettings
  </Role>
  <Role name="ComputeNode">
    <Instances count="4" />
    <ConfigurationSettings>
     <Setting name="Microsoft.WindowsAzure.Plugins.Diagnostics.ConnectionString" value="UseDevelopmentStorage=true" />
    </ConfigurationSettings>
 </Role>
</ServiceConfiguration>
Here we’ve configured one instance of the FrontEnd role, one instance of the HeadNode role, and four instances of the ComputeNode role. The Powershell script parses the two configuration files and creates Windows Azure Nodegroups to correspond to each role. If in future you wish to change the topology of your cluster, simply edit these two files accordingly and re-run the Powershell script.
- Your Powershell console should look something like this when the deployment is complete:
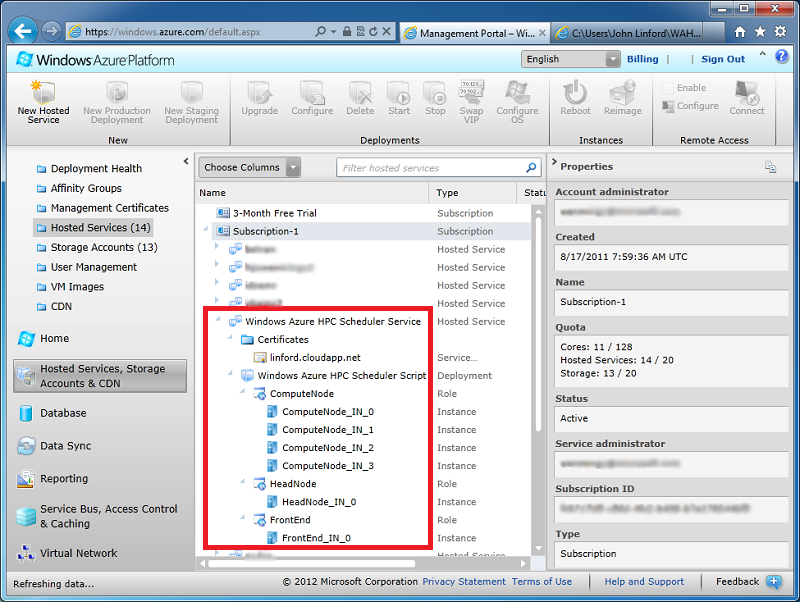
Go to the Management Portal and click on Hosted Services, Storage Accounts & CDN. Select your subscription and find the Windows Azure HPC Scheduler Service to see all the node instances in your new compute cluster:
Additional Resources
You can view the original blog posting on this topic by Wenming Ye on the MSDN blog.
The official Windows Azure Training Course is an excellent resource for learning to develop applications and services for Windows Azure. Topics covered there include:
Most of these training modules require Microsoft Visual Studio Professional or higher. Visual Studio Express versions are not supported.
The Windows Azure HPC Scheduler can also be deployed via Microsoft Visual Studio 2010 Professional. See Getting Started with Application Deployment with the Windows Azure HPC Scheduler to learn more.